Overview
There are several menu locations and configuration options available on your Lede website, including the Main Menu, Footer Menus, Topics Menu, and Navigation (Nav) Bar. This article describes how to create and configure these menus.
How to Access Menu Settings
- Navigate to your WordPress Admin > Appearance > Menus
How to Create a New Menu
- In the “Edit Menus” tab, click “create a new menu”.
- A new menu form will appear.
- In the “Menu Name” field, enter the name of your new menu.
- Note: The Footer Menus and Topics Menu names will display on the website in the respective menu’s location. Main Menus and Nav Bar names will not display on the website.
- Note: The Footer Menus and Topics Menu names will display on the website in the respective menu’s location. Main Menus and Nav Bar names will not display on the website.
- Click the “Create Menu” button.
Menu Settings
- Auto add pages
- If this box is checked for a menu, new top-level pages will automatically be added to this menu upon creation. For instance, if you check this box on your Footer Main menu and then create a new “About Us” top-level page, that page link will automatically be added to your Footer Main menu.
- To manage your pages, click on “Pages” in the left navigation bar in the WordPress Admin.
- If this box is checked for a menu, new top-level pages will automatically be added to this menu upon creation. For instance, if you check this box on your Footer Main menu and then create a new “About Us” top-level page, that page link will automatically be added to your Footer Main menu.
- To manage your pages, click on “Pages” in the left navigation bar in the WordPress Admin.
- Display location
- You can check the box of the corresponding location where you want this menu to display on your website.
- If a different menu is set to display in any of the locations, it will be indicated next to that location in parentheses ().
- You can check the box of the corresponding location where you want this menu to display on your website.
- If a different menu is set to display in any of the locations, it will be indicated next to that location in parentheses ().
- Delete Menu
- To delete a menu, click the “Delete Menu” button at the bottom left of the Menu Settings.
- To delete a menu, click the “Delete Menu” button at the bottom left of the Menu Settings.
- Click the “Save Menu” button to save any changes to the Menu Settings.
How to Add Items to a Menu
- In the “Edit Menus” tab, click the “Select a menu to edit” dropdown to select the menu you’d like to edit. Once you’ve selected the desired menu, click the “Select” button.
- Under the “Add menu items” header, you can add links any of the following content on your website:
- Pages
- Posts
- Profiles
- Ad Campaigns
- Custom Links (see below)
- Categories
- Pages
- Posts
- Profiles
- Ad Campaigns
- Custom Links (see below)
- Categories
- Click the content type that you’d like to add to this menu to open its accordion panel.
- The “Most Recent” tab displays a selection of the most recently created content for that type.
- The “View All” tab displays all of the items in that content type (up to fifty items) in alphabetical order.
- The “Search” tab allows you to search for a specific item in that content type.
- The “Most Recent” tab displays a selection of the most recently created content for that type.
- The “View All” tab displays all of the items in that content type (up to fifty items) in alphabetical order.
- The “Search” tab allows you to search for a specific item in that content type.
- Locate the item you’d like to add to this menu by using one of the tabs described above.
- Click the checkbox(es) of the desired item(s).
- To add all of the items listed in a tab, click the “Select All” checkbox.
- To add all of the items listed in a tab, click the “Select All” checkbox.
- Click the “Add to Menu” button.
Custom Links
- To add a custom link to a menu (e.g. a link to an external website), click the “Custom Links” accordion panel.
- In the “URL” field, type or paste the desired URL.
- In the “Link Text” field, type or paste the display text for the link.
- Click the “Add to Menu” button.
How to Edit a Menu’s Structure
- In the “Edit Menus” tab, click the “Select a menu to edit” dropdown to select the menu you’d like to edit. Once you’ve selected the desired menu, click the “Select” button.
How to Reorder Items in the Menu
- Click on an item and drag it to your desired location.
- Additionally, you can click the arrow to the right of an item to reveal more configuration options. From here, you can click to move the item “Up one” space, “Down one” space, or “To the top” of the menu.
How to Remove Items from a Menu
- To remove multiple items at once:
- Click the “Bulk Select” checkbox.
- Click the revealed checkboxes next to each item you’d like to remove.
- Review the “List of menu items selected for deletion” for accuracy.
- Click “Remove Selected Items”.
- Click the “Save Menu” button.
- Click the “Bulk Select” checkbox.
- Click the revealed checkboxes next to each item you’d like to remove.
- Review the “List of menu items selected for deletion” for accuracy.
- Click “Remove Selected Items”.
- Click the “Save Menu” button.
- To remove a single item:
- Click the arrow to the right of the item to reveal configuration options.
- Click “Remove”.
- Click the “Save Menu” button.
- Click the arrow to the right of the item to reveal configuration options.
- Click “Remove”.
- Click the “Save Menu” button.
How to Rename a Menu Item
Note: Menu items are labeled with their title by default. For example, a Page titled “About Us” will automatically be assigned that same label in a menu.
- Click the arrow to the right of the item to reveal configuration options.
- In the “Navigation Label” field, type or paste the new label for that menu item.
- Click the “Save Menu” button.
How to create Submenus
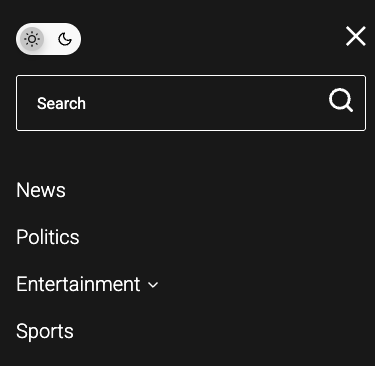
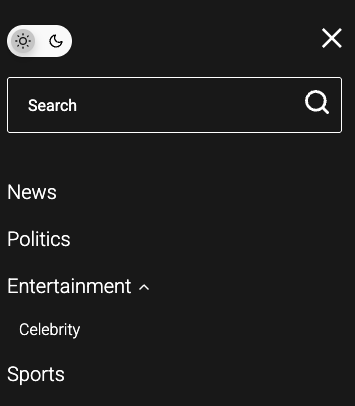
Note: Submenus are available only in the Main Nav locations and are limited to one-level of nesting depth.
- Identify the items you would like in the submenu
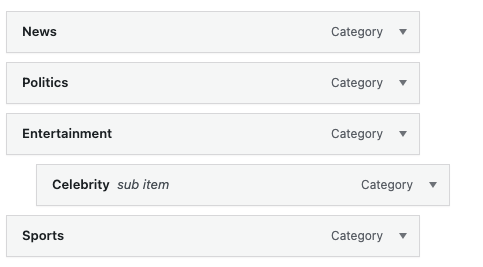
- Drag the menu items to the right until the “sub-item” label displays in the menu item as in the screenshot below
Screenshot of menu with a sub-item
The closed submenu
The open submenu
How to Manage Menu Display Locations
The display location for a menu can be set under Menu Settings on the “Edit Menus” tab (see above) or on the “Manage Locations” tab. On the “Manage Locations” tab:
- You can click “Use new menu” next to a menu location to create a menu for that display location.
- You can also select an existing menu by clicking the dropdown next to a menu location to choose the menu you want to assign to that location.
- Once a menu is selected in the dropdown, you can click “Edit” to edit that menu’s content, settings, or structure.
- Once a menu is selected in the dropdown, you can click “Edit” to edit that menu’s content, settings, or structure.
- Click the “Save Changes” button.
Main Menu
There are a few customization options available for your Main Menu, which is the pop-out navigation menu indicated by the hamburger (three horizontal lines) icon located at the top right of your site.
Main Menu Styles
To adjust the text or background color, location, or format of your Main Menu:
- In the Publisher App, go to Settings > Appearance and expand the “Main Menu” group
To change the text or background color of the Main Menu:
- Select an option from the “Background Color” and/or “Text Color” dropdowns.
- Available colors:
- Your primary, secondary, or accent brand colors (also managed in the Appearance > Colors group).
- White (Background Color only).
- Black (Text Color only).
- You can also select “default”, which is black for the background color and white for the text color.
- Available colors:
- Available colors:
- Your primary, secondary, or accent brand colors (also managed in the Appearance > Colors group).
- White (Background Color only).
- Black (Text Color only).
- You can also select “default”, which is black for the background color and white for the text color.
- Your primary, secondary, or accent brand colors (also managed in the Appearance > Colors group).
- White (Background Color only).
- Black (Text Color only).
- You can also select “default”, which is black for the background color and white for the text color.
- Click the “Save” button.
To change the location of the Main Menu:
- Select an option from the “Menu Location” dropdown.
- “default”: the Main Menu pops out from the left side of the screen.
- “right”: the Main Menu pops out from the right side of the screen
- Note: the Main Menu hamburger icon will always display at the top left corner of your site, regardless of the “Menu Location” setting.
- “default”: the Main Menu pops out from the left side of the screen.
- “right”: the Main Menu pops out from the right side of the screen
- Note: the Main Menu hamburger icon will always display at the top left corner of your site, regardless of the “Menu Location” setting.
- Click the “Save” button.
To change the format of the Main Menu:
- Select an option from the “Menu Format” dropdown.
- “default”: the Main Menu contains one column. If Main Nav – Menu 2 is set, it will display below the content of Main Nav – Menu 1. The Login, Subscribe, and social media buttons will also display below the content of Main Nav – Menu 1 (and Main Nav – Menu 2, if set).
- “wide”: the Main Menu contains two columns. Main Nav – Menu 2 must be set, and will display to the right of Main Nav- Menu 1 content. The Login, Subscribe, and social media buttons will display below the content of Main Nav – Menu 2.
- “default”: the Main Menu contains one column. If Main Nav – Menu 2 is set, it will display below the content of Main Nav – Menu 1. The Login, Subscribe, and social media buttons will also display below the content of Main Nav – Menu 1 (and Main Nav – Menu 2, if set).
- “wide”: the Main Menu contains two columns. Main Nav – Menu 2 must be set, and will display to the right of Main Nav- Menu 1 content. The Login, Subscribe, and social media buttons will display below the content of Main Nav – Menu 2.
Main Nav – Menu 1 (Required)
This is the main navigation for your site. Include links to your most popular or important content that you want to draw users to.
- Displays in the main pop-out menu at the top (“default” Main Menu Format) or left (“wide” Main Menu Format).
- Text for this menu is larger than the text for Main Nav – Menu 2.
- “Menu Name” will not display for this location.
Main Nav – Menu 2 (Optional)
Note: This menu is required if using the “wide” Main Menu format option.
- Displays in the main pop-out menu at the bottom (“default” Main Menu Format) or right (“wide” Main Menu Format).
- Text for this location is smaller than the text for Main Nav – Menu 1.
- “Menu Name” will not display for this location.
Nav Bar (Optional)
- Displays horizontally under the site Global Header.
- “Menu Name” will not display for this location.
- We do not recommend using this menu location if you are using the “angle” Header Decoration option for your Global Header Styles.
Footer Main (Required)
- Displays at the bottom of the website, under your site logo.
- “Menu Name” will display for this location.
Footer Menu – Columns Two, Three, and Four (Optional)
- Displays at the bottom of the website, to the right of Footer Main.
- “Menu Name” will display for these locations.
Footer Legal (Required)
- Displays at the bottom of the website, under Footer Main and above the Copyright.
- “Menu Name” will not display for this location.
Topics (Optional)
- Displays on Category and Tag pages.
- “Menu Name” will display for this location everywhere that it appears.
Adding Menus to Homepage/Pages
Once a menu has been created, it can be added to the Homepage/Pages using the “Navigation” block.